Time required:
Approximately 1.5 hours including walking time.
Purpose:
Introduce basic soil science concepts such as soil layering (horizonation) and colour, as well as soil chemical and physical properties such as degree of acidity/alkalinity (pH) and texture (particle size). These characteristics can be compared within sites (between layers), and for older or more advanced students the complexity can be increased by introducing the idea of inter-relationships between soil properties and topography, geology and vegetation. This could include concepts such as variation in soil moisture as determined by drainage.
This activity is best done in tandem with the Geology Activity Sheet.
Materials:
IN THE FIELD
Hand trowel to clean the face of the soil exposure and collect samples
Plastic bags and marker pens to collect and label samples
AT HOME/SCHOOL
- ‘wet area’ (outside probably best) for doing soil textures
- Soil pH kit/s (available at most hardware stores and nurseries)
- 2mm grate-size metal sieves for sieving out gravels/stones
- bottles of water
- rulers for measuring soil ‘worms’
- pen and paper to record data
- hand-washing facilities (student bathrooms should be adequate)
While it is usual to complete soil pH tests and texturing in the field, the logistics of a large group may make this impractical. If this is the case, it is suggested that samples are collected, bagged and labelled for testing back at school.
Preparation & Assumed Knowledge:
Students should be introduced to the idea that rocks are made up of different minerals, and that soils are the decomposition (weathering) products of rocks. As there are different types of rocks, you should expect different types of soils, but the position in the landscape (amongst other things) also determines soil characteristics. Talk to the students about the different size fractions that make up a soil (i.e. sand, silt and clay) and why these different size fractions are important. This information is particularly important for the more advanced activities.
While in the field, it is important to point out the change in vegetation as you move from the flatter areas up on to the hill. This information is also likely to be important for the more advanced activities.
Further Information
For further soil-related resources and activities you may like to contact The Green Machine Education Centre at CSIRO Black Mountain
Preparation Activity – Why soil is important to us?
On the board write three headings: (1) soil and people, (2) soils and animals and (3) soil and plants. As a group, get the class to brainstorm all the ideas and write them under the relevant headings. Examples are presented in the table below.
| Soil and people | Soil and animals | Soil and plants |
|---|---|---|
| Farming for our food | For digging in and burying things (dogs) | To support their roots |
| Foundations for building our houses | As a home (wombats, ants) | Supply of water |
| Growing plants for our garden | Plants for food (rabbits, sheep etc) | Supply of nutrients |
| Protection of seeds |
Once the brainstorming has finished the similarities and differences between the 3 columns could be discussed. For example:
All living organisms are reliant on the soil in some way => we could not eat if we did not have soil to grow our food.
Most plants need soil to survive => plants convert carbon dioxide to oxygen so we could not breathe without the plants.
How to conduct a soil pH test
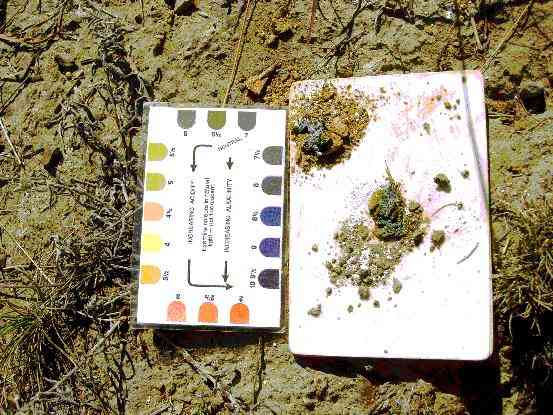
- For each soil layer use the 2mm sieve to sieve out roughly a teaspoon-sized sample of soil.
- Place it on the piece of white plastic provided in the pH kit.
- Take the bottle of green indicator liquid from the kit and place a few (3-4 drops) on the soil.
- Use a stick or twig to mix the soil and the liquid until the sample looks like wet soil. Take the bottle of white powder and gently dust the powder over the wet soil. You should only need to apply a light dusting, and the powder should start to change colour almost immediately.
- Allow to sit for 5-10 minutes, and then use the indicator card to read off the pH value. You may notice variation in colour within any given sample – the colour you match the card to should be the dominant colour in the sample.
NOTE: the actual result (i.e. pH value) you get may vary slightly from sample to sample. Do not be concerned, as this is merely the natural variability in the soil which can be influenced by things like plant roots, animal burrows, etc.
Key Learning Outcomes:
Students should be able to:
Identify layers within a soil profile and distinguish them on the basis of their boundary and colour (basic), pH (intermediate) and texture (advanced).
Understand that these layers have different properties
Understand that soils in different landscape positions have different properties
SITE 1
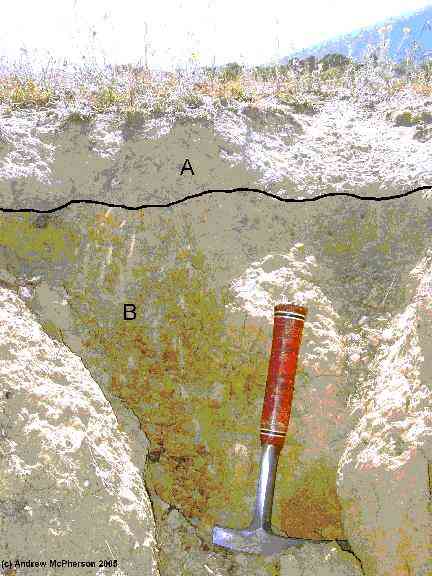
Soil profile on the eastern (Black Mountain) side of the erosion gully near Caswell Drive, approximately 20 m from the fence near where the bike path crosses the gully. This profile overlies volcanic rocks (the Mount Painter Volcanics). These are ‘intrusive’ volcanic rocks formed within the Earth, and are abundant in minerals that decompose to clay. These intrusive volcanic rocks should NOT be confused with ‘extrusive’ volcanic rocks that are formed by volcanoes at the Earth’s surface (e.g. lava that formed the Hawaiian Islands).
Ground surface down to a depth of roughly 10 cm: A horizon; white/light grey
Deeper than 10 cm: B horizon; yellow/brown
This profile is known as a ‘duplex’ profile. This means that there is a big difference between the top layer (A) and the layer beneath (B). This difference can be attributed to a number of things, but is primarily interpreted as removal of clay and organic matter from the top layer (a process known as ‘eluviation’) and deposition of the clay lower in the profile (a process known as ‘illuviation’). These processes should be considered to operate both vertically (from top to bottom in the profile) and laterally (from higher in the landscape to lower in the landscape), but for the purposes of this exercise we will consider only the vertical component.
NOTE: The gravels and small stones within the soil material have been moved there by water or, to a lesser extent, by soil creeping down the hill under the influence of gravity. Generally speaking these gravels have either been washed down gullies as alluvial material (the same way rivers transport sediment) or washed down hill by overland flow (thin sheets of water that run down hill). To remove the bias that these large particles cause when texturing a sieve is used to ensure that you are only sampling the
Within a soil profile the movement of clays does a number of things:
1) Creates a very ‘abrupt’ or ‘sharp’ boundary between the top and bottom layers. When a soil profile is younger (geologically speaking), or under different drainage conditions, the degree of differentiation may be much less. An intermediate state is called a ‘gradational’ profile, while very immature profiles showing little differentiation are referred to as ‘diffuse’, and no differentiation as ‘uniform’.
2) Causes the top layer to be very pale or even white, as it is the clay (and any attached iron oxides) that provides much of the colour in a soil, with organic matter also contributing to a lesser extent. At the same time the lower layer will tend to develop yellow, brown, orange or red colours, depending on how well drained (how wet or dry) the profile is. The redder the soil generally the better drained it is, as the water content controls the types of iron oxides that are present. This is why soils at or near the tops of hills are usually quite red or orange, and progressively get more yellow and then brown as you move down hill. This transition is known as a ‘toposequence’.
3) Influences the chemistry of the soil. Many chemical compounds (such as those that make up salts) are strongly attached to clay, so moving clay into the lower layers will generally tend to:
(a) Increase the ‘acidity’ of the upper layer (i.e. pH < 7), as the H+ ion becomes more dominant. (b) Increase the ‘alkalinity’ of the lower layer (i.e. pH >7) as the basic ions such as Na+ and Ca2+ become more abundant in the lower layers.
The soil chemistry is also important in determining the development of soil structure (for example the ‘blocky’ structure seen in layer B at Site 1), but this level of detail will not be explored here.
4) Changes the texture of the material. Moving clay into the lower layer means that its particle size distribution becomes dominated by the smaller sized clay particles, making the soil ‘heavier’, and often more difficult to get water through. Meanwhile the upper layer becomes more dominated by the larger silt- and sand-sized particles, giving this material a ‘lighter’ texture.
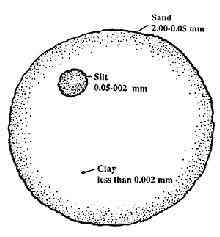
In the natural environment soils are made up of mineral materials grouped into three main size classes: sand, silt and clay.
· Sand (2.00 mm – 0.05 mm in diameter) can be seen with the naked eye.
· Silt (0.05 mm – 0.002 mm in diameter) can be seen with a hand lens.
· Clay (less than 0.002 mm in diameter). The individual clay grains cannot be seen with a hand lens.
These different size fractions determine the way a soil feels (or its texture).
Why is texture important?
Different textured soils behave differently and control the types of plants that are able to grow. Sandy soils are better drained but are poor at holding nutrients. Kangaroo Paws and Sturt’s Desert Pea thrive in sandy soils that freely drain and have very few nutrients. Silt and clay soils are much better at holding onto plant nutrients, although a soil with too much clay will make it difficult for plants to access these nutrients, and may also become too wet for many types of plants to survive. Sedges and bull rushes like to grow in these types of soils. The best soil types for agricultural purposes (and for your backyard veggie patch) are a combination of sand, clay, silt and organic matter. These soils are called ‘loams’, and they retain the ideal amount of moisture and nutrients for optimal plant growth.
SITE 2
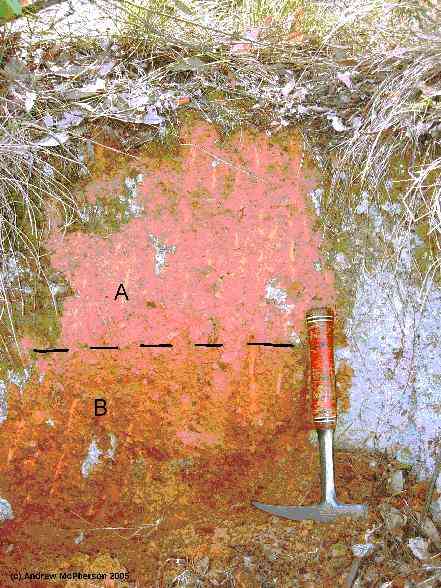
Soil profile exposed (and set slightly into) a road cutting on the eastern (Black Mountain) side of the fire trail running around the perimeter of the woodland area, about 100 m northwest of the stile leading onto the fire trail.
Ground surface down to a depth of roughly 20-40cm: A horizon; pale red/orange
Deeper than 20-40cm: B horizon; strong red
This profile is a ‘gradational’ profile. This means that the distinction between the top layer (A) and the layer beneath (B) is not as sharp as it is at SITE 1. This is because the profile is formed in younger material that has had less time for the clay to be moved from the upper to the lower layer. It is also partly a function of (a) the site being higher in the landscape with less sediment moving down hill onto it and staying there, and (b) the underlying rocks containing minerals that produce less clay when they decompose
This activity worksheet can be viewed and downloaded from here.
Threre are also three student activity sheets that can be downloaded: basic level, intermediate level and advanced level.